Laying A Stone Walkway
Laying a stone walkway transforms any outdoor space, adding both beauty and functionality. This guide delves into the process, from initial planning and design to the final touches, equipping you with the knowledge and confidence to create a stunning and durable walkway. We’ll explore various stone types, preparation techniques, laying methods, and essential maintenance tips, ensuring your project is a resounding success.
Whether you envision a meandering path through a garden or a straight walkway leading to your front door, this comprehensive guide provides a step-by-step approach, covering everything from choosing the right materials and tools to troubleshooting common issues. We’ll examine different design styles, offering visual descriptions to inspire your creativity and help you bring your vision to life.
Planning & Design: Laying A Stone Walkway
Careful planning and design are crucial for a successful stone walkway project. This phase involves creating a layout, selecting materials, and developing a detailed step-by-step plan. Proper planning ensures efficiency and minimizes potential problems during construction.
Walkway Layout and Materials List
For a 10x20ft area, a design incorporating both curves and straight sections can create visual interest. Consider a gentle curve leading to a straight section, perhaps near a garden entrance or patio. A materials list should include:
- Stone pavers (quantity depends on chosen size and layout)
- Edging materials (e.g., concrete, metal, or natural stone)
- Gravel or crushed stone base
- Weed barrier fabric
- Sand or polymeric sand for grouting
- Shovel, rake, tamper, measuring tape, string line, wheelbarrow, etc.
Step-by-Step Plan for Laying a Stone Walkway
- Site preparation: Clearing the area, excavating, and compacting the base.
- Laying the weed barrier fabric.
- Installing edging materials to define the walkway perimeter.
- Adding the base layer of gravel or crushed stone and compacting it thoroughly.
- Laying the stone pavers, ensuring proper spacing and alignment.
- Grouting the walkway with sand or polymeric sand.
- Cleaning excess grout and finishing touches.
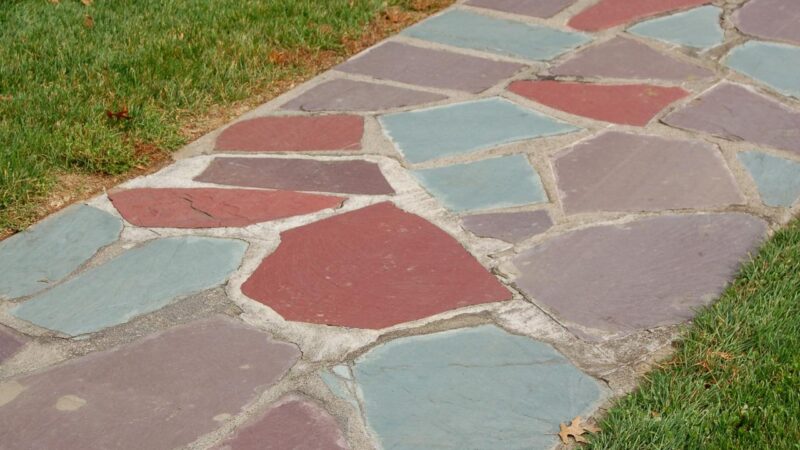
Comparison of Stone Types for Walkways
Various stone types offer different aesthetic qualities and practical considerations. The following table compares some popular choices:
| Material | Cost (Approximate) | Durability | Maintenance |
|---|---|---|---|
| Flagstone | Medium to High | High | Low to Medium |
| Pavers (Concrete, Brick) | Low to Medium | Medium to High | Low |
| Cobblestones | High | Very High | Low |
| Slate | Medium to High | High | Low |
Site Preparation
Proper site preparation is essential for a durable and long-lasting stone walkway. This involves careful excavation, base preparation, and weed barrier installation.
Excavation Depth and Width
Source: sportskeeda.com
Excavate to a depth of approximately 6-8 inches for a stable base. The width should be slightly wider than the planned walkway to accommodate the base materials and edging.
Base Preparation and Compaction
A well-compacted base is critical for preventing the settling and shifting of the stones. Use a plate compactor or hand tamper to achieve a firm, level base. Multiple layers of compacted gravel may be necessary for uneven ground.
Installing Weed Barrier Fabric
Laying weed barrier fabric prevents weed growth from beneath the stones, reducing future maintenance. Overlap the fabric edges to prevent weed penetration. Secure the fabric edges with soil or landscape pins.
Laying the Stones
The method of laying stones significantly impacts the walkway’s appearance and durability. A running bond pattern is a common and visually appealing choice. Proper cutting techniques are also crucial for curves and irregular spaces.
Running Bond Pattern
The running bond pattern involves laying stones with their long sides parallel to the walkway’s length, offsetting each row by approximately half the length of a stone. This creates a visually appealing, interlocking pattern. A simple illustration would show two rows of rectangular stones, with the second row offset to create a staggered effect.
Cutting Stones for Curves and Irregular Spaces

Source: thespruce.com
Use a masonry saw or a diamond blade on an angle grinder to cut stones to fit curves and irregular spaces. Pre-planning and precise measurements are key to achieving a clean, seamless fit. Dry fitting before applying mortar can help refine the cuts.
Using Edging Materials
Edging materials provide a neat and finished look to the walkway, preventing stones from shifting and creating a defined boundary. Common edging materials include concrete, metal, or natural stone, chosen to complement the walkway’s aesthetic.
Materials & Tools
Having the right tools and materials on hand ensures a smooth and efficient project. Selecting appropriate stone types based on application is also crucial.
Comprehensive List of Tools and Materials
A complete list includes: measuring tape, string line, shovel, rake, tamper, wheelbarrow, masonry saw or angle grinder with a diamond blade, safety glasses, gloves, stone pavers, edging materials, gravel or crushed stone base, weed barrier fabric, sand or polymeric sand for grouting, and a broom.
Types of Stone and Their Applications
Flagstone is suitable for a rustic look, pavers for a more formal appearance, and cobblestones for a historic or traditional feel. The choice depends on personal preference, budget, and the overall landscape design.
Visual Representation of a Tool Kit
Imagine a sturdy wheelbarrow containing a shovel, rake, and tamper. Nearby, a neatly organized toolbox holds a measuring tape, string line, and safety glasses. A separate area would house the masonry saw or angle grinder and diamond blade.
Grouting & Finishing
Grouting stabilizes the walkway, prevents weed growth, and enhances the overall appearance. Choosing the right grout and proper cleaning techniques are crucial for a successful finish.
Grouting Process
Sweep sand or polymeric sand into the gaps between stones, ensuring complete filling. Use a broom to work the grout into the joints. Allow the grout to be set according to the manufacturer’s instructions.
Selecting Appropriate Grout
Polymeric sand offers superior weed control and durability compared to regular sand. The choice depends on the stone type and the desired level of weed prevention.
Cleaning Excess Grout
After the grout has been partially set, use a broom to sweep away any excess. A stiff brush can be used to clean grout from the stone surfaces, taking care not to damage the stones.
Walkway Styles & Designs
Different walkway styles and designs can significantly impact the overall aesthetic of a landscape. The choice of stone type also plays a crucial role in the final look and feel.
Three Different Walkway Designs
- Straight Walkway: A simple, linear design suitable for narrow spaces or connecting points directly. Imagine a straight path made of uniform pavers, creating a clean, modern look.
- Curved Walkway: A more meandering path that adds visual interest and softens the landscape. Picture a gently curving path of flagstone, winding through a garden.
- Meandering Walkway: A more informal, winding path that creates a natural and relaxed feel. Envision a path made of cobblestones, following the contours of the land.
Aesthetic Appeal of Different Stone Types

Source: pinimg.com
Flagstone offers a rustic, natural appearance; pavers provide a more formal and structured look; cobblestones create a traditional or historic feel. The choice depends on the overall landscape design and personal preference.
Examples of Stone Walkway Designs, Laying a stone walkway
| Design Type | Stone Type | Pros | Cons |
|---|---|---|---|
| Straight | Pavers | Clean, modern look; easy to install | Can be less visually interesting |
| Curved | Flagstone | Natural, rustic appearance; flexible design | Can be more challenging to install |
| Meandering | Cobblestones | Traditional, historic feel; durable | High cost; labor-intensive installation |
Troubleshooting & Maintenance
Understanding potential problems and implementing proper maintenance practices ensures the longevity of the stone walkway.
Common Problems and Solutions

Source: tqn.com
Uneven settling can be addressed by lifting and re-compacting the base. Weed growth can be controlled with proper weed barrier installation and regular weeding. Damaged stones can be replaced with matching stones.
Maintenance Tips
Regular sweeping removes debris and prevents buildup. Periodically inspect for loose stones or damaged sections. Addressing issues promptly prevents larger problems.
Repairing Damaged Sections
Source: gamerempire.net
Damaged stones can be carefully removed and replaced with matching stones. Ensure proper grouting to secure the new stone and maintain the walkway’s integrity.
Questions Often Asked
What is the best time of year to lay a stone walkway?
Spring or fall are generally ideal, as the ground is neither frozen nor excessively dry. This allows for proper compaction and minimizes settling.
How much does it cost to lay a stone walkway?
The cost varies greatly depending on the size of the walkway, the type of stone used, and whether you hire professionals or do it yourself. Obtain multiple quotes for accurate cost estimation.
How long does a stone walkway last?
With proper installation and maintenance, a well-built stone walkway can last for decades, even generations. The longevity depends on the stone type and the quality of the base.
Can I lay a stone walkway on a slope?
Yes, but extra care must be taken to ensure proper drainage and stability. You may need to incorporate retaining walls or other structural elements.
What type of grout is best for a stone walkway?
The best grout depends on the stone type and the climate. Choose a grout that is compatible with your stones and resistant to weathering and cracking.
Comments are closed.