Laying A Flagstone Path
Laying a flagstone path transforms a simple backyard into a captivating landscape feature. This guide provides a comprehensive walkthrough, from initial design considerations and material selection to the final finishing touches and ongoing maintenance. We’ll explore various design options, including straight and curved paths, and delve into the practical aspects of excavation, base preparation, flagstone placement, and gap filling. Whether you’re a seasoned DIY enthusiast or a novice gardener, this detailed approach will equip you with the knowledge and confidence to create a stunning and durable flagstone path.
The process involves careful planning to ensure a visually appealing and structurally sound path. This includes considering the overall landscape design, selecting appropriate flagstones, and preparing a stable base. Proper techniques for laying the flagstones, managing drainage, and completing the finishing touches are crucial for a long-lasting result. We will address common challenges and provide solutions to ensure a successful project.
Planning and Designing Your Flagstone Path
Creating a flagstone path adds both beauty and functionality to your backyard. Careful planning ensures a visually appealing and durable result. This section Articulates the key steps involved in designing and planning your flagstone path project.
Flagstone Path Layout Design
A successful design balances aesthetics with practicality. For a small backyard, consider a path layout that maximizes space while maintaining a pleasing visual flow. A simple, straight path might suit a narrow space, while a gently curving path can add visual interest to a larger area. A diagram could show a straight 10-foot path, 3 feet wide, with flagstones laid in a running bond pattern. Alternatively, a curved path could meander through planting beds, creating a more natural feel. The choice depends on your space and personal preference.
Materials List for a 10-Foot Path

Source: ytimg.com
Accurate material estimation is crucial for a smooth project. For a 10-foot long, 3-foot wide path, you’ll need approximately 100-120 square feet of flagstone (depending on stone size and layout). This translates to roughly 60-70 individual flagstones, assuming an average size of 1.5-2 square feet per stone. You’ll also need approximately 1 cubic yard of gravel for the base, and 0.5 cubic yards of sand as a bedding layer. Add edging materials, such as 10 linear feet of landscape edging, to define the path’s perimeter.
Flagstone Path Design Comparison: Straight vs. Curved
Straight paths offer a clean, modern look, ideal for smaller spaces or areas requiring clear directional flow. They are easier to install and require less material cutting. Curved paths, on the other hand, create a more natural and inviting feel, suitable for larger backyards. However, they require more planning and precise flagstone cutting. The impact on the overall landscape varies significantly; a straight path complements formal gardens, while a curved path suits informal or naturalistic landscapes.
Step-by-Step Installation Plan

Source: ytimg.com
A well-defined plan ensures efficient installation. The process can be divided into several key stages:
- Site Preparation (2 days): Excavation, soil compaction, base preparation.
- Flagstone Laying (3 days): Laying flagstones, cutting stones as needed, ensuring proper drainage.
- Finishing Touches (1 day): Filling gaps, adding edging, cleaning, and sealing.
This timeline is an estimate and can vary based on the project’s complexity and weather conditions.
Site Preparation for Your Flagstone Path: Laying A Flagstone Path
Proper site preparation is fundamental to a stable and long-lasting flagstone path. This section details the crucial steps involved in preparing your site for installation.
Excavating the Area
Excavation depth should be approximately 6-8 inches to accommodate the gravel base, sand bedding layer, and flagstones. The width should be slightly wider than the planned path width to allow for proper edging and prevent erosion.
Soil Compaction
Compacting the soil base eliminates settling and ensures path stability. Use a plate compactor or hand tamper to achieve a firm, level base. Neglecting this step can lead to uneven settling and flagstone displacement over time.
Creating a Level Base
A level base prevents uneven settling and ensures a smooth, comfortable path. The process involves layering gravel and sand.
| Step | Action | Tools | Considerations |
|---|---|---|---|
| 1 | Lay a 4-inch layer of gravel | Shovel, rake, level | Ensure proper drainage by slightly sloping the gravel base away from any structures. |
| 2 | Compact the gravel | Plate compactor or hand tamper | Compact thoroughly to prevent settling. |
| 3 | Add a 2-inch layer of sand | Shovel, rake, level | Level the sand carefully to create a perfectly even surface. |
| 4 | Compact the sand | Hand tamper | Avoid over-compacting the sand, as this can make it difficult to work with. |
Dealing with Sloping Terrain
Sloping terrain requires additional steps to ensure path stability. Methods include terracing (creating level platforms) or constructing retaining walls to support the path on steeper slopes. Proper drainage is especially critical in sloping areas to prevent water erosion.
Laying the Flagstones
This section describes the techniques for laying flagstones, ensuring a beautiful and durable path.
Laying Flagstone Technique
Begin by laying out the flagstones dry (without mortar) to visualize the pattern and ensure proper fit. Maintain consistent spacing between stones (typically ½ – 1 inch). Use a level to check for evenness. Once satisfied, remove the stones and begin the installation with your chosen bedding material.
Cutting Flagstones
Cutting flagstones to fit specific areas or create curves requires a masonry saw with a diamond blade. Score the stone several times before breaking it along the score line. Wear safety glasses and gloves during cutting.
Using Different Bedding Materials
Several materials can be used for bedding flagstones:
- Mortar: Offers excellent stability and durability, but requires more skill and time.
- Sand: Simple and easy to work with, but provides less stability than mortar, particularly in areas with heavy foot traffic.
- Polymer Sand: A newer option that offers increased stability and weed resistance compared to regular sand.
Ensuring Proper Drainage

Source: hiltonlandscapesupply.com
Proper drainage prevents water accumulation, which can damage the path and surrounding landscaping. Ensure the gravel base slopes slightly away from any structures. You can also use a permeable bedding material to allow water to drain through the path.
Finishing Touches for Your Flagstone Path
These final steps enhance the path’s aesthetic appeal and longevity.
Filling Gaps Between Flagstones, Laying a Flagstone Path
Sweep sand or gravel into the gaps between the flagstones to stabilize the stones and prevent weed growth. Use a broom to ensure even distribution.
Creating a Visually Appealing Border
A border enhances the path’s visual appeal and helps define its edges. Use natural materials like edging stones or low-growing plants to create a harmonious border that complements your landscaping.
Cleaning and Sealing the Path
Clean the finished path thoroughly to remove any debris or excess mortar. Apply a sealant to protect the flagstones from weathering, staining, and frost damage.
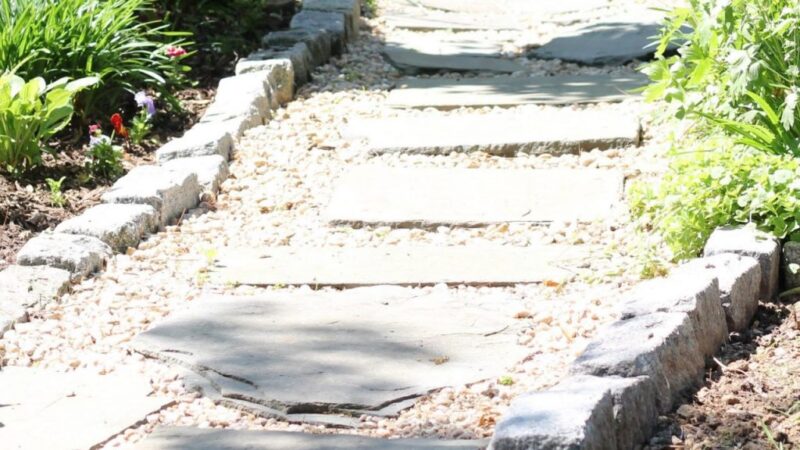
Visual Representation of a Completed Path
Imagine a gently curving path, 3 feet wide, made of natural-toned flagstones varying in size and shape, creating a rustic yet elegant look. The path is bordered by low-growing thyme, adding a fragrant touch. The gaps between the flagstones are filled with light brown gravel, complementing the stone color.
Troubleshooting and Maintenance
This section addresses common problems and provides solutions for maintaining your flagstone path.
Common Problems and Solutions
Common problems include uneven settling, weed growth, and damaged flagstones. Uneven settling can be addressed by lifting and resetting the affected stones. Weed growth can be controlled with regular weeding or the use of weed-preventative landscaping fabric. Damaged flagstones can be repaired or replaced.
Repairing Damaged Flagstones

Source: thespruce.com
Damaged flagstones can be repaired by using mortar to re-secure them or by replacing them with new stones. Ensure a proper fit and level surface.
Maintenance Requirements

Source: lehmanlane.net
Regular maintenance involves weeding, cleaning, and occasional resealing. Sweep away debris and remove weeds promptly to prevent damage. Reseal the path every few years to maintain its protection.
Preventing Future Problems
Proper installation and regular maintenance are key to preventing future problems. Ensure a stable base, use appropriate bedding material, and maintain proper drainage to extend the lifespan of your flagstone path.
Commonly Asked Questions
What type of flagstone is best for my climate?
The best flagstone depends on your local climate. For freeze-thaw cycles, choose a frost-resistant stone. In arid climates, consider stones less prone to cracking from heat.
How much does a flagstone path cost?
The cost varies significantly depending on flagstone type, quantity, labor costs (if hiring professionals), and additional materials.
How long does it take to lay a flagstone path?
The time required depends on the path’s size and complexity. A small path might take a weekend, while a larger, more intricate one could take several days or even weeks.
Can I lay a flagstone path on a slope?
Yes, but it requires additional steps to ensure proper drainage and stability. This often involves terracing or creating a stepped path.
What tools do I need to lay a flagstone path?
Essential tools include shovels, rakes, tampers, levels, measuring tapes, and potentially a masonry saw for cutting stones.
Comments are closed.