Installing A Flagstone Path
Installing a flagstone path transforms a simple backyard into a captivating landscape feature. This guide provides a comprehensive walkthrough, from initial planning and ground preparation to laying the flagstones and adding those finishing touches that elevate the project. We’ll explore various design options, cost considerations, and maintenance tips, ensuring your flagstone path not only looks stunning but also stands the test of time. Learn how to create a beautiful and functional pathway that enhances your outdoor space.
This detailed guide covers every step of the process, providing clear instructions and helpful tips for achieving professional results. Whether you are a seasoned DIY enthusiast or a beginner tackling your first landscaping project, this comprehensive resource will empower you to successfully install a flagstone path you’ll be proud of. We’ll cover everything from choosing the right materials and tools to mastering techniques for laying and finishing the path, making the process both enjoyable and rewarding.
Planning a Flagstone Path: Installing A Flagstone Path
Creating a flagstone path involves careful planning to ensure a beautiful and functional addition to your backyard. This section Articulates the design process, necessary tools, and base depth considerations for a successful installation.
Flagstone Path Design and Material Quantities, Installing a flagstone path
For a small backyard, a meandering path adds visual interest. Consider the available space and desired aesthetic when designing your path. A simple, straight path is suitable for smaller spaces, while curves can create a more natural look in larger areas. The following table provides an example of a 10-foot-long path, 2 feet wide.
| Item | Quantity | Dimensions | Notes |
|---|---|---|---|
| Flagstones | Approximately 20 | 12″ x 12″ (average) | Adjust based on the chosen stone size and path design. |
| Gravel Base | 1 cubic yard | – | Depth will depend on soil compaction. |
| Sand Bedding | 0.5 cubic yard | – | For leveling and stability. |
| Edging (optional) | 20 linear feet | – | Choose material to complement flagstones. |
Necessary Tools and Equipment
Having the right tools ensures a smooth and efficient installation process. Proper tools minimize effort and maximize the quality of the finished path.
- Shovel
- Wheelbarrow
- Rake
- Level
- Measuring tape
- String line
- Mason’s hammer
- Chisel (for cutting flagstones)
- Gloves
- Safety glasses
Determining Path Base Depth
The depth of the path base depends on the soil type and drainage requirements. Clay soil requires a deeper base than well-drained sandy soil. Proper base depth ensures stability and prevents settling. For a small backyard path, a total base depth of 6-8 inches is usually sufficient. This should be divided into 4-6 inches of compacted gravel and 2 inches of sand.
Preparing the Ground

Source: sunset02.com
Proper ground preparation is crucial for a long-lasting and level flagstone path. This involves excavating, creating a stable base, and managing drainage to prevent water damage.
Excavating and Compacting the Area
Begin by marking the path’s Artikel using string lines and stakes. Excavate the area to the desired depth (6-8 inches), ensuring a level base. Use a tamper or plate compactor to thoroughly compact the soil. A level base is essential for a stable path. This will prevent uneven settling and cracking of the flagstones.
Creating a Gravel and Sand Base
Source: pinimg.com
A well-constructed base layer provides stability and drainage. The following steps detail the process:
- Add a 4-6 inch layer of compacted gravel. This provides drainage and support.
- Level the gravel using a rake.
- Compact the gravel thoroughly using a tamper or plate compactor.
- Add a 2-inch layer of sand on top of the compacted gravel.
- Level the sand using a rake to create an even surface.
Managing Drainage
Effective drainage prevents water accumulation under the flagstones, which can lead to frost heave and damage. A slightly sloped path, away from buildings, helps with drainage. Consider incorporating a drainage layer of gravel or perforated pipe beneath the base if the soil is prone to waterlogging. A simple diagram would show a cross-section of the path, illustrating the sloped sand layer over the gravel base. The slope should be subtle, perhaps 1-2% grade, to allow water to flow away naturally.
Laying the Flagstones

Source: thespruce.com
This section details the methods for laying flagstones, cutting them to size, and ensuring a level and visually appealing path.
Dry-Laying vs. Mortar Setting
Dry-laying involves placing flagstones directly onto the sand base without mortar. This method is simpler and allows for easier adjustments. Mortar setting provides greater stability and is preferable for areas with heavy foot traffic. Dry-laying is suitable for smaller paths with less traffic, while mortar setting is recommended for high-traffic areas. The choice depends on your needs and preferences.
Cutting Flagstones

Source: sunset02.com
Use a chisel and mason’s hammer to cut flagstones to fit specific areas. Score the stone along the cutting line before applying forceful taps with the hammer. Wear safety glasses to protect your eyes from flying debris.
Leveling and Aligning Flagstones
Achieving a level and visually appealing path requires careful leveling and alignment. Use a level to ensure each stone is level with its neighbors. Maintain consistent spacing between stones for a uniform look. The following table shows typical spacing examples.
| Stone Size | Typical Spacing | Notes |
|---|---|---|
| 12″ x 12″ | 1/2″ – 1″ | Adjust spacing based on stone size and desired look. |
| 18″ x 18″ | 3/4″ – 1 1/2″ | Wider spacing might be needed for larger stones. |
Finishing Touches
Adding finishing touches enhances the aesthetic appeal and longevity of your flagstone path.
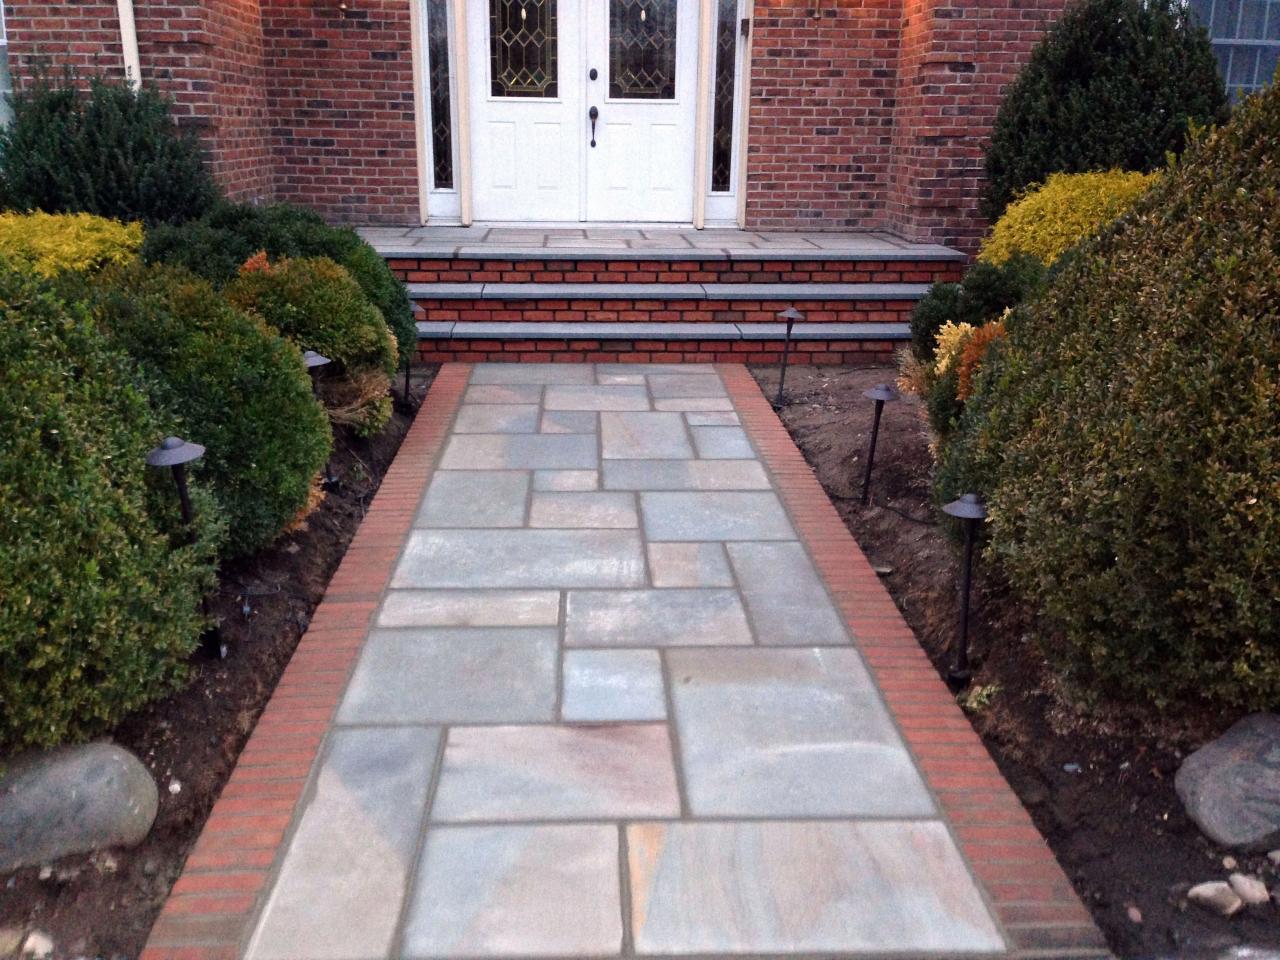
Adding Edging
Edging provides a neat and finished look. Options include brick, stone, or metal edging. Choose a material that complements your flagstones and landscaping.
Filling Gaps Between Flagstones
Fill gaps between flagstones with sand or polymeric sand. Sweep the sand into the gaps to prevent weed growth and stabilize the path. Polymeric sand hardens over time, providing added stability.
Maintenance Tips
Regular maintenance ensures the long-term beauty and durability of your flagstone path. Regular sweeping removes debris and prevents weed growth. Periodically check for loose stones and re-level as needed.
- Sweep regularly to remove debris.
- Check for loose stones and re-set as needed.
- Top up sand in gaps as needed.
- Avoid using harsh chemicals or power washing.
Alternative Path Designs
This section explores alternative flagstone path layouts and cost comparisons.
Alternative Flagstone Path Layouts
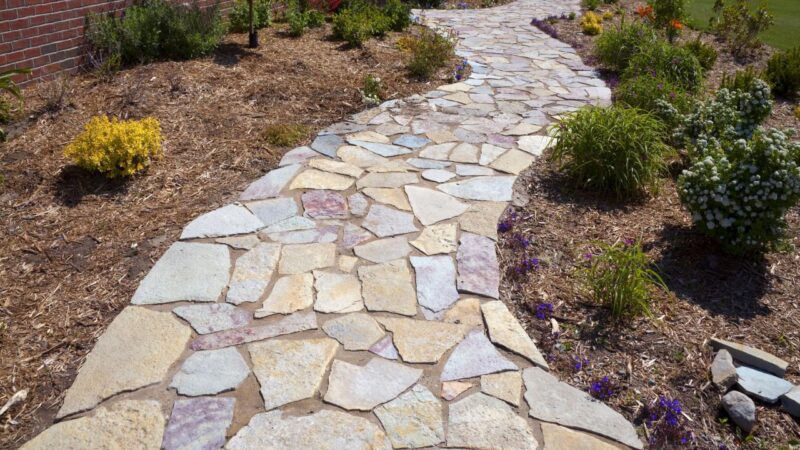
- Curved Path with Varying Stone Sizes: A meandering path using a mix of square and rectangular flagstones creates a dynamic and natural look. The varying sizes add visual interest.
- Straight Path with Uniform Stone Sizes: A simple, straight path using uniformly sized square flagstones offers a clean and modern aesthetic. This design is ideal for smaller spaces.
- Circular Path with Stepping Stones: A circular path using smaller, irregularly shaped flagstones as stepping stones creates a whimsical and playful design. This is perfect for a secluded garden area.
Cost Comparison of Different Flagstone Types
The cost of flagstone varies depending on the type and source. The following table provides a cost comparison for a 20-foot-long path, assuming a 2-foot width.
| Flagstone Type | Cost per Square Foot | Total Cost (Estimate) | Notes |
|---|---|---|---|
| Bluestone | $8-$15 | $160-$300 | High-end option, durable and attractive. |
| Flagstone (standard) | $4-$8 | $80-$160 | Mid-range option, widely available. |
| Pavers | $2-$5 | $40-$100 | Budget-friendly option with, a less natural look. |
Flagstone Path Integrated with Landscaping

Source: pinimg.com
Imagine a flagstone path winding through a lush garden. The path, made of warm-toned flagstones, meanders gently past vibrant hostas and ferns. A low retaining wall of natural stone, similar in color to the flagstones, subtly defines the path’s edges. The overall effect is one of serene natural beauty. The path’s gentle curves lead the eye deeper into the garden, where a small water feature adds a tranquil touch. The scene is bathed in dappled sunlight, highlighting the rich textures of the plants and stones.
FAQ Explained
What type of flagstone is best for a path?
The best type depends on your budget and aesthetic preferences. Bluestone and flagstone are popular choices known for their durability and attractive appearance. Consider factors like thickness, frost resistance, and color variations.
How long does it take to install a flagstone path?
The installation time varies depending on the path’s size and complexity. A small path might take a weekend, while larger projects could require several days or even a week.
Can I install a flagstone path myself?
Yes, with careful planning and attention to detail, many homeowners can successfully install a flagstone path themselves. However, for large or complex projects, consider seeking professional help.
How do I prevent weeds from growing in the gaps between flagstones?
Use a landscape fabric under the gravel base to inhibit weed growth. Thoroughly fill gaps between stones with polymeric sand, which hardens and prevents weed seeds from sprouting.
What is the best time of year to install a flagstone path?
Spring or fall are generally ideal, as the ground is neither too frozen nor excessively hot and dry. Avoid installing during periods of heavy rain or extreme temperatures.
Comments are closed.