Putting In A Paver Walkway
Putting in a paver walkway transforms any outdoor space, adding both beauty and functionality. This guide delves into the process, from initial planning and material selection to the final touches, offering a step-by-step approach to creating a stunning and durable walkway. We’ll explore various paver types, base preparation techniques, and essential installation methods, ensuring you have the knowledge to tackle this project with confidence. Whether you’re a seasoned DIY enthusiast or a beginner, this comprehensive guide provides the tools and information you need to achieve professional results.
This project involves careful planning, precise execution, and attention to detail. We will cover everything from designing your walkway’s layout and selecting the appropriate materials to ensuring proper drainage and achieving a polished, professional finish. The satisfaction of creating a beautiful and functional walkway with your own hands is truly rewarding.
Planning the Paver Walkway: Putting In A Paver Walkway
Creating a beautiful and functional paver walkway involves careful planning. This section the design process, necessary tools, and site preparation steps for a successful project. We will focus on a 10ft x 5ft area as an example, but the principles can be scaled for larger or smaller projects.
Walkway Design and Material Selection
A well-designed walkway considers both aesthetics and functionality. For our 10ft x 5ft example, we’ll use a simple running bond pattern. The following table details the materials required:
| Paver Type | Quantity | Color |
|---|---|---|
| Concrete Pavers | 100 (approximate, allowing for cuts and waste) | Gray |
| Edging Stones | 20 linear feet | Matching gray |
| Polymeric Sand | 1 bag (check manufacturer’s recommendations for coverage) | Gray |
Necessary Tools and Equipment, Putting in a paver walkway
Having the right tools ensures a smooth and efficient installation. The following is a list of Artikels essential equipment:
- Shovel
- Wheelbarrow
- Rake
- Tamp/Compactor
- Measuring Tape
- String Line
- Level
- Rubber Mallet
- Paver Cutter (wet saw recommended)
- Gloves
- Safety Glasses
Site Preparation
Proper site preparation is crucial for a long-lasting walkway. This involves excavation and base preparation to ensure a level and stable surface.
- Mark the area: Use string and stakes to define the 10ft x 5ft walkway area.
- Excavate: Dig down approximately 4-6 inches deep. This depth will accommodate the base material and pavers.
- Level the ground: Use a rake and level to ensure a completely flat surface.
- Compact the soil: Use a hand tamper or compactor to firmly compact the excavated soil. This prevents settling later.
- Add a weed barrier (optional): This helps prevent weeds from growing through the pavers.
Installing the Paver Base
A well-prepared base is vital for a stable and long-lasting walkway. This section details the process of creating a stable and level base, including base material comparisons and drainage considerations.
Creating a Stable and Level Base

Source: ytimg.com
The base material provides support for the pavers and ensures proper drainage. For our example, we will use a gravel base, which is common and effective. The process involves spreading a 2-3 inch layer of gravel evenly across the prepared area and compacting it thoroughly using a plate compactor or hand tamper to achieve a firm, level surface.
Comparison of Base Materials
Different base materials offer varying levels of stability and drainage. The following table compares common options:
| Material | Stability | Drainage | Cost |
|---|---|---|---|
| Gravel | High | Excellent | Moderate |
| Sand | Moderate | Good | Low |
| Compacted Earth | Low | Poor | Very Low |
Ensuring Proper Drainage
Source: housedigest.com
Proper drainage prevents water from accumulating under the pavers, which can lead to frost heaves and damage. A slight slope (approximately 1/4 inch per foot) should be created across the base to direct water away from the walkway. This can be achieved by carefully grading the base material during installation. Imagine a gently sloping plane, directing water flow to one side of the walkway. This subtle incline, barely noticeable to the eye, is critical for effective drainage.
Laying the Pavers
This section provides a step-by-step guide for laying pavers, ensuring proper spacing and alignment, and offering techniques for cutting pavers.
Step-by-Step Paver Installation

Source: ytimg.com
- Lay out the first row: Begin at one end of the walkway and lay the first row of pavers, ensuring they are aligned and spaced evenly.
- Continue laying pavers: Continue laying pavers in rows, maintaining consistent spacing and alignment. Use a rubber mallet to gently tap the pavers into place.
- Check for levelness: Regularly check the levelness of the pavers using a level. Make adjustments as needed.
- Cut pavers as needed: Use a paver cutter to cut pavers to fit around curves or obstacles.
- Maintain consistent spacing: Use spacers to maintain uniform gaps between pavers, typically 1/8 to 1/4 inch.
Cutting Pavers and Pattern Selection
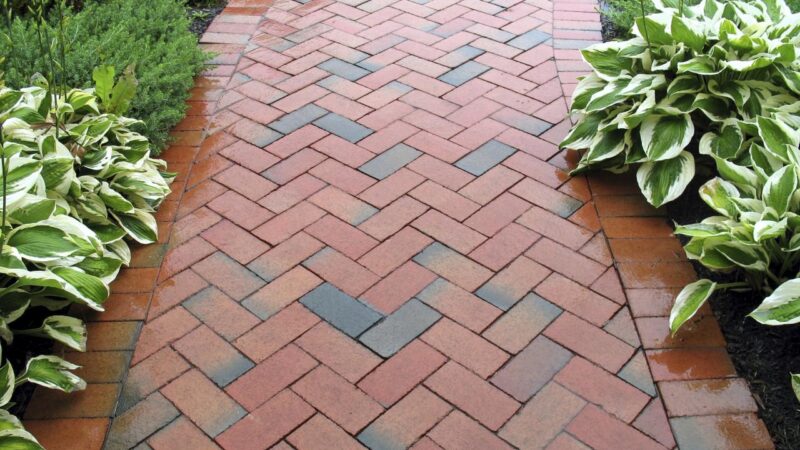
Cutting pavers may be necessary to accommodate curves or obstacles. A wet saw is recommended for clean, precise cuts. The running bond pattern, characterized by a staggered arrangement of pavers, is simple to execute and visually appealing. The herringbone pattern, with its V-shaped arrangement, is more complex but creates a sophisticated look. Visualize the running bond as bricks laid end-to-end, then offsetting each subsequent row by half a brick. For the herringbone, imagine arranging the pavers at a 45-degree angle, forming a zig-zag pattern.
Edging and Finishing

Source: paversdrivewaysva.com
This section details the process of installing edging, filling joints with polymeric sand, and cleaning up excess material. Proper edging enhances the walkway’s appearance and provides stability.
Installing Edging
Edging provides a neat, finished look and prevents the pavers from shifting. For our example, we’ll use matching gray edging stones. These are set in place along the perimeter of the walkway, ensuring they are level with the pavers. The edging stones should be firmly embedded in the base material to provide stability.
Filling Joints with Polymeric Sand
Polymeric sand is swept into the joints between pavers, filling gaps and preventing weed growth. Follow the manufacturer’s instructions for application. After spreading the sand evenly across the surface, thoroughly wet the sand according to package directions to activate the polymers and create a strong bond.
Compacting and Cleaning
After the polymeric sand is wetted, it needs to be compacted. A broom can be used to work the sand deeper into the joints. Excess sand should be swept away, leaving a clean and finished walkway.
Considerations for Different Paver Types
Various paver materials offer unique characteristics and installation requirements. This section compares concrete, brick, and natural stone pavers.
Comparing Paver Materials
The choice of paver material impacts the walkway’s appearance, durability, and maintenance requirements. The following table summarizes the key differences:
| Paver Material | Durability | Cost | Maintenance |
|---|---|---|---|
| Concrete | High | Moderate | Low |
| Brick | High | High | Moderate |
| Natural Stone | Very High | Very High | Moderate to High |
Challenges and Solutions
Each paver type presents unique challenges. For example, cutting natural stone requires specialized tools and expertise. Concrete pavers can crack under heavy loads if the base is not properly prepared. Addressing these challenges through proper planning and installation techniques ensures a successful outcome.
Long-Term Maintenance
Regular maintenance extends the life of any paver walkway. This includes periodic cleaning, weed removal, and addressing any damaged pavers. Natural stone pavers, while durable, may require occasional sealing to protect against staining.
Top FAQs
What is the average cost of installing a paver walkway?
The cost varies greatly depending on factors like paver type, size of the walkway, labor costs, and location. It’s best to obtain multiple quotes from contractors.
How long does a paver walkway installation typically take?
The timeline depends on the size and complexity of the project, but it can range from a few days to several weeks for larger installations.
How do I maintain a paver walkway?
Regular sweeping and occasional power washing are recommended. Weed control and joint sand replenishment are also important aspects of long-term maintenance.
Can I install a paver walkway myself?
Yes, with proper planning and preparation, many DIY enthusiasts successfully install paver walkways. However, for large or complex projects, professional assistance may be beneficial.
What type of edging is best for a paver walkway?
Several options exist, including metal, plastic, and natural stone edging. The best choice depends on your aesthetic preferences and budget.
Comments are closed.